Total Pageviews

Wednesday 16 March 2011

Item review-Zagg InvisibleSHIELD for the iPhone 4

Hello again and I hope everything is well where ever you are. I am currently counting down the days until a litter of German Wire Haired Pointers are born, hopefully this weekend coming, as one of the pups will be coming to live with us! We lost both our Weimaraner and Labrador last year, within 6 weeks of each other and our house feels so empty without them. I am still stuck on a name for the new pup so feel free to give me and Amanda some ideas lol!

Anyway back to the purpose of today's post which is an item review and the item in question is the,

Zagg InvisibleSHIELD for the iPhone 4.


Many iPhone 4 users use a case of some sorts but there are also a lot who prefer their device "nude" and I can see their point. The iPhone 4 is a very nice looking device and it is a shame that, for protection, we tend to hide them away inside cases. For those that wish to use their device without a case, but desire a good amount of protection, look no further than the Zagg InvisibleSHIELD iPhone 4 Screen Protector.

What is the InvisibleSHIELD?

The InvisibleSHIELD is a film protector that is specifically cut for the iPhone 4. It is available from www.MobileFun.co.uk and costs £16.95.

In use it basically surrounds the iPhone 4 in a complete layer of highly durable film which acts like a case but without the restrictions a case brings.

The InvisibleSHIELD is made of a film that has been used in the military to provide protection for the leading edges of helicopter rotor blades so it will comfortably cope with anything you decide to throw at it. For those who doubt a film can protect as well as a case, please watch this video!
Now if you couple that with the fact that Zagg have been making protective film since 2005 AND offer a full 30 year warranty, you will realise that this is pretty serious stuff!

What's in the box?

Zagg provide everything needed to correctly install the InvisibleSHIELD. The box contains one complete set of protectors on pre cut sheets, a micro fibre cloth, a decent squeegee applicator, a bottle containing application spray and comprehensive fitting instructions.

contents

How do I fit the InvisibleSHIELD?

The most important ingredient when applying any form of film body protection is patience!, which quite often precludes me from doing the job lol! As with all film applications you must also ensure that your device is completely free from any finger prints or dust contamination.

spray, cleaning cloth and applicator squeegee
Once the device is clean and you have washed your hands to remove any grease I suggest you start with the rear screen protector. Why?, well this is the easiest to fit and will give you a chance to hone your skills!
Remember that the InvisibleSHIELD has an adhesive on the reverse, hence the bottle of applicator fluid. This fluid allows you to apply the film and then move it on the iPhone 4 to ensure it is properly aligned.
Select the rear screen protector and remove the backing paper. Take the applicator bottle and spray the adhesive side of the protector with enough spray to ensure it is fully covered but without it being drenched. Make sure you also spray some of the contents on your fingers as this will prevent the film from sticking to you.
I always start at the bottom of my device when I attempt to line up the screen shield and as such it is a case of aligning the film with the bottom of the iPhone 4.


Now apply the film, adhesive side down, to the device. Do not worry if you encounter air bubbles as this is easily sorted. Whilst the film is moist you can move it on the iPhone so that it is perfectly aligned.
Once you are happy take the squeegee and gently squeeze the air bubbles by working them from the centre of the iPhone outwards. There may be odd, small bubbles left after this process, these will vanish in a day or so so don't worry. Now remove any excess fluid using the micro fibre cloth or some soft paper towel.


Now repeat this process with the front protector, take your time and make sure the protector is fully aligned.
The side and end films are a bit fiddly but easy enough if you keep your fingers moist with the spray solution. I suggest you do the easy side of the iPhone first. You will notice that all parts of the film are specifically cut for the edges and ends of the iPhone 4 so if it doesn't fit you have used the wrong bit!

Finally please remember to spray the film NOT the iPhone4!

Conclusions.

The Zagg InvisibleSHIELD certainly offers a serious amount of protection against scratches and if you are like me and have keys/coins in your trouser pockets, then it is a godsend.
The plus points for using it are the fact that your device isn't hidden away from view and is kept at its intended dimensions so there is no added bulk.
There are some negative points and from my point of view they are as follows. You cannot use any of the slim cases as the fit is too tight and will cause the film to bubble up and ultimately damage it beyond repair. You can use cases like the leather pouches and the flip style if you wish.
You will also notice a degree of "orange peeling" when your iPhone screen is off. This can be a little off putting but does not detract from its use.
Thirdly the Zagg InvisibleSHIELD is quite expensive but it is made of the highest quality materials.

Overall.

If I didn't use a case then I would have no hesitation in using the Zagg InvisibleSHIELD. I paid a lot of money for my iPhone 4 and I want to keep it looking its best. I like the fact that Zagg are a very established company who clearly know what the user wants in a film protector. The contents and instructions are top notch.
Application is so straight forward once you have got the knack, remember that patience over speed is the secret! The finished product is excellent and I personally don't mind the "orange peeling" effect.
I also like the fact that there is the 30 year warranty, this shows the confidence that Zagg have in the product.

I award this product a very healthy 8.5/10

Andy.

Monday 14 March 2011

App review-Touch Retouch

Hello again on a day dominated by the tragic earthquake and tsunami in Japan. No words can really do justice to what is happening over there at this time, my thoughts go out to everyone involved.

Back to the purpose of today's post. How many of you regularly take photographs with your iPhones only to find out at a later date that there are plenty of unwanted additions to the image such as, advertising or random people that just spoil the picture? In the past the photo would probably have ended up being deleted but now there is an answer to this problem.

Touch Retouch-(29mb) 59p from the Apple App store.


Touch Retouch is an app that allows you to amend any image you have taken on your device and it really is very versatile.

Example.

I took this picture of the Grand Union canal and it is spoilt by the brick building in the distance. Using Touch Retouch I can now remove that building in a few easy steps. 


Original image
Step 1. 

By touching the "move" icon, a gold star next to the icon will highlight your choice of action, you can zoom into the building making the next step much easier. You zoom by using the normal, two finger, pinch and release gestures used in all apps. 


"Move" selected and zoom used

Step 2.

Touch the "lasso" icon and place your finger over the building. You will notice a small box pop up within the image which allows you to see what is happening beneath your finger as you move it around the building. This is a really excellent idea and shows the amount of thought and design that has gone into making this app.
Move your finger around the building until it is fully highlighted.


"Lasso" selected and showing the "in image" pop up box
 Step 3.

Once you are happy with the highlighted area touch the "go" icon and allow the app to re process the image. 

building now highlighted and ready to be processed

Step 4.

Having touched the "go" icon wait a short time for image to be processed.

Image being processed

Final result.

As you can see, the building has now been removed and the image much improved!

Building removed!

You can now save your image back to the camera roll on the iPhone.


Image saved to camera roll
As you can see, by using Touch Retouch I have improved my original photograph in a few simple steps. The resulting image is, in my opinion, much better and far more attractive. I amended this picture using just one feature of the app, the lasso but there are three other features called, brush, clone stamp and eraser, all of which perform slightly different tasks. All four of the editing features are fully adjustable to make editing of your images completely flexible.

The possibilities are literally endless with this app. You can do as much or as little as an image requires, whether it be removing an object or simply touching up your loved ones face!!! Use this in conjunction with Photogene and you have everything you could possibly need for photo editing.

There are two in app "help" video's to help you get the best out of the software, I can recommend viewing them just to give you an idea of how the app functions.

Touch Retouch is easily picked up and fun to use. I consider it an essential for any of you that use your device to take photographs so what are you waiting for?!

I have no hesitation in awarding this little gem 5/5.

Andy.

Friday 11 March 2011

iPhone 4 case review-SwitchEasy Vulcan

Hi guys and gall's, I thought I would add a post now as I need cheering up having seen the England cricket team capitulate in the World Cup!

There is a huge range of iPhone 4 cases on the market and making the correct choice can be a bit over whelming. I generally buy my cases on recommendation which is why I provide so many reviews of these particular items.

Today I would like to introduce you to the,

SwitchEasy Vulcan.

SwitchEasy Vulcan for the iPhone 4
This case is available in black only and can be purchased from http://www.mobilefun.co.uk. It is priced at £20.37.

What's in the box?


Package contents
I think we are all used to manufacturers providing us with screen protectors etc but SwitchEasy have taken this one step further. Along side the case they also provide 2 front screen protectors, a micro fibre cleaning cloth, a screen protector application card and two 30 pin connector plugs as well as two 3.5 mm audio jack protector plugs. This is a brilliant idea and in use really does protect your device from dust etc.

The Vulcan.

The case is made of an ultra durable hydro polymer material ( SwitchEasy's words not mine!). This material feels like a very tough, heavyweight but flexible silicon that appears to be tear proof as well as extremely durable. The case is described as "ultra black" by the makers but this is misleading as it is very slightly translucent.

The Vulcan in use.

Fitting the case is very easy. As always I recommend fitting it button side first and then gently work the bevelled edges over your device. If you use a screen protector take your time working the edges of the case over to prevent the protector from bubbling.


If you choose to use the port protectors, the Vulcan offers a high degree of protection. The bevelled edges provide a good amount of "lay on the table" protection.

good "lay on the table" protection
In the hand the Vulcan feels very nice and the grip is excellent due to the nature of the silicon like material. Although the silicon does attract finger prints is is extremely scratch resistant and remains very smart looking. The case is very sleek and adds very little to the weight or size of your device.
The Vulcan has button covers for the volume controls and the on/off switch. These buttons are well made and very tactile when pressed, adding to the overall quality feel of the case.

volume control buttons

on/off button with audio jack "plugged"
The Vulcan also has good cut outs for the 30 pin dock connector and the camera and flash. I experienced no problems when taking pictures with my device.

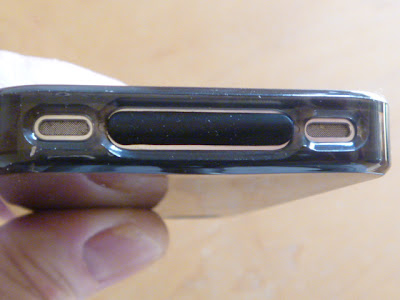
30 pin dock connector cut out with plug in use

well designed camera and flash cut out
Everything about the SwitchEasy Vulcan shouts out "style" and the degree of protection is very good indeed. As an everyday case for "normal" use the Vulcan really is excellent.

Conclusion.

There is nothing to dislike about the SwitchEasy Vulcan. It is competitively priced, good looking and offers a good amount of day to day protection. In short it is a top quality product and as such I have no hesitation in recommending it to you.

I can happily give this case 5/5.

Andy.

Tuesday 8 March 2011

iPhone 4 accessory review-Beats Tour earphones by dr.dre

Hi again and what a gorgeous day it is. Bright sunshine, warm weather and the cricket World Cup going well, what more could a man ask for! Anyway back to the post, the weather will have to wait!

The iPhone 4 is an exceptional device but is sadly let down by terrible earphones. I know of very few people that use the OEM earphones beyond the first few days before they buy a decent set but the choice of after market earphones is huge and can be very confusing. I guess I am like a lot of people in so far as I generally go on recommendations.

Today I would like to introduce you to the,

Monster Beats Tour "in ear" earphones by dr.dre.


What's in the box?

The first thing you will notice about these earphones is the packaging which is incredible. A lot of time and effort has gone into the quality of the packaging and the contents do not let you down either.

a box full of goodies!
In addition to the earphones, Monster supplies you with a sturdy carry case, instructions and, other than the ear buds already fitted, there are an additional 5 pairs of buds to ensure you find a perfect fit. The attention to detail fills you with the confidence that you are dealing with a quality piece of hardware.

The earphones.

Monster Beats Tour earphones
The first thing you will notice about these earphones is the cable which is flat! Monster claim that the cable is tangle free and from my experience they are. The days of spending ages untangling a spiders web is certainly history with these earphones! The cable is also very generous in length being about 4 feet long from jack to speakers.

The earphones are very well made and a fair bit heavier than others I have tried. You can really feel the quality of the materials used and they look very smart in the black and red colour scheme. Whilst they are not noise isolating, once fitted correctly they certainly reduce any outside noise.

quality materials throughout
Each speaker is clearly marked and nicely finished with a silver chrome edging. A tip when trying out the different ear buds is to squeeze the foam, insert into the ear and allow the foam to expand within your ear. I do this each time I use any set of "in ear" earphones and it certainly helps with the fitting.

The earphones are also fitted with what is called ControlTalk. This is basically a hands free mic and control that is fitted so it falls close to hand. With ControlTalk you can answer calls and talk hands free. You can also pause, advance tracks and control the volume.

"ControlTalk"
Another nice feature of the Monster Beats Tour is the way the jack is angled at 45 degrees to the cord thus allowing for a flush fitting to your device. I have tried these earphones with a number of different cases and they have always fitted well.

angled jack

flush fitting even with a case
In use.

First off and as already mentioned is the fact that the Monster Beats Tours are heavy. This does sometimes give the feeling that they are about to fall out and as such I would not recommend them when "on the go". These earphones are most suited for home use where they perform extremely well.

The audio quality is excellent with the bass being deep and the treble crisp. The earphones certainly reproduced my music choices well throughout the volume settings with no noticeable distortion. I dare say if I had younger ears I could really get an acoustic thump going lol!

When not in use they store away nicely in the carry case provided.


carry case
Conclusion.

Overall the Monster Beats Tour earphones perform very well in certain environments. As mentioned, they are not really suitable for use when exercising etc due to the weight of the speakers.

All materials used are of a very high quality and the finish is second to none but this does come at a price to your pocket. The Monster Beats Tour retail at £139.99 which will immediately put them out of some budgets however they are available for considerably less if you are prepared to shop around.

Ear phones are very much an item of personal choice. What suits my ears may, very well be totally unsuitable for others so it is important to take the time to try different makes.

A final word of caution when buying these ear phones via the web. They are very widely copied, the fakes are very good. With that in mind please take the time to search on WWW.YouTube.com for various, informative videos on this particular problem.

I give these ear phones 4/5.

Andy

Thursday 3 March 2011

App review-Photogene

Hello all and before I start I would just like to say a big thank you to those that support this blog. This week the site had it's 2000th visitor which is way more than I ever expected to get! I was looking at the stats the other day and I have had visits from all over the world. I forget that this is the "World Wide Web"!

It has been a busy week for Apple as they announced the roll out of the iPad 2 and, more importantly for us, the newest version of the iPhone 4 operating system. IOS version 4.3 will be available on March 11th so make sure you have all updated iTunes to 10.2 ready for the big day! I will, of course, bring you a comprehensive review of what is new with IOS 4.3.

Anyway back on topic. In my last review I promised that I would do a more thorough review of a couple of apps. Being a man of my word today I bring you one of those reviews. Today's review is on,

Photogene. 4.1mb and £1.19 from the Apple App store.


When I first got my iPhone 4 I spent a lot of time and a fair bit of money looking for a decent photo editing app. There are many such apps on the Apple App store and a majority of them were either way too complicated for me! or filled with features I would never use. However having spent a fair few hours using Photogene, I can honestly say it is the best app in its class that is currently available.

Photogene has every setting you can ever wish for when touching up pictures you have taken with your iPhone. It is very straight forward and brilliantly laid out making the job of editing pictures fun. If you couple that with the fact that the end results are more than acceptable what you have is the perfect bit of software.

I will run through each setting giving a brief description of what they do but remember that half the fun is trying different effects!

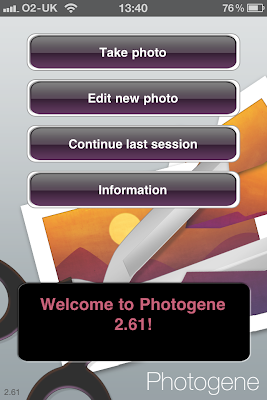
Login screen

As seen in the image above, the login screen gives you three options. I generally don't edit my pictures at the time they are taken. I prefer to do it in comfort with a cuppa! 

Once you have selected to load an image or take a picture, the said image will be loaded to a default screen with a list of icons on the left hand side.


default screen
If you hover your finger over the icons there is a text pop up which will tell you what each icon signifies. You can move the image anywhere on the screen and zoom or shrink using the 2 finger pinch gesture.

The first icon on the left is the crop feature.

Crop.


crop screen
When you crop an image you are basically removing areas of a picture you no longer wish to be included in the final result.

In the crop setting you can either elect to choose a preset or, more commonly chosen, choose to crop the image manually.

I always choose to manually crop my images and it is made so easy with Photogene. You will notice from the image above that there is a box which contains a lighter version of the image along with blue spots on each corner. Simply touch and drag the spots to choose the area you wish to work with. Cropping is made easier by the grid that pops up within the image. This grid is there to help you construct a well balanced picture.
Within the grid there is also a number which indicates what size resolution you are currently working with.

Once you are happy with your cropped image click on the crop button. Remember that no decision is final with Photogene. You can press the undo arrow, the reset button or the cancel button at anytime should you be unhappy with the result.

The next section is the rotate section.

Rotate.

rotate screen
In the rotate screen you can move the image around its vertical and horizontal axis as well as rotate the image by 90 degrees at a time either to the left or the right.

In addition you can also choose to straighten the picture, again there is a pop up grid to help you.

Now we are moving on to the fun part of the app. The next icon on the list is the filters icon.

Filters.

filter screen
It is at this point that you can really let the "creative juices" flow! Even I enjoy the following screens and I have zero artistic abilities!!

Your picture will default to the sharpen setting along with a slider bar. Sharpen does exactly what it says, it gives the picture more definition. Here is a handy tip, always zoom in to the area you wish to sharpen. In this case it will be the boat as this is the main object of this image, unless of course you want to concentrate on the canal bank!

Once I have zoomed in I will move the slider by very small increments until I am happy with the image. Remember there are no hard and fast rules when editing a picture. What I may find acceptable will look completely wrong to someone else.

Once you are happy you can then select more filter effects by touching the sharpen box. This will bring up 7 more choices including pencil, blur and black and white.

more filter choices
Again you can play around with these settings to get the image of your choice. Again please remember that nothing is final. You can change your mind and roll back at any time so don't be afraid to experiment.

The next icon is for the colour adjust setting.

Colour adjust.

colour adjust screen
This screen looks a little more complicated but it isn't. Within colour adjust there are many settings to make improvements to contrast, colour saturation, colour temperature etc.

If you wish you can click the auto button where available or, if like me, you can have a "play" with each of the level settings. It is surprising by how much you can improve the original image using the colour adjust and some really good results are possible, particularly if you are using a black and white image.

The next icon in the list is for the symbols setting.

Symbols.


symbols screen
The symbols screen allows you to insert any one of a variety of speech bubbles. Now this is not really necessary as an image improvement but it can make for some funny pictures none the less.

All of the text bubbles are configurable on screen, you can alter the colour and border as well as the text from here.

symbol screen

symbol screen
As I have already mentioned, using your imagination and the available choices can produce some really funny results. This is a setting I have really started to use when editing family and friends images!!

The next icon in the list is for the frames settings.

frames screen
This setting allows you to apply a choice of frame should you so wish. As with the other settings, Photogene provides a really good selection of frames and frame effects. Sometimes adding a frame can really set the image off well.

In addition to frames you can also select different back ground colours, which again can make a real difference to the finished image.


background setting

background setting

That is the last of the image editing features. The last icon gives you a variety of choices as to what you want to do with the finished image.

last screen
From here you can choose to save the image to the iPhones photo albums. You also have a choice of image size and resolution. You can also upload the image to your FaceBook, Twitter or Flicker account or email it.

Conclusions.

I really do like Photogene. It is a cracking piece of software that is well supported by its makers. There have already been a number of excellent updates which are free and indications are that it will stay that way.

For the money I have yet to see better on the Apple App store but I have definitely seen and used worse.
The interface for this app is clean and easily understood and the final results are very good, even to my untrained eye!

I give Photogene 5/5 it really is that good.

Hopefully some of you will give it a go, you never know I may even see the results one day on the interweb!!

Andy


Tuesday 1 March 2011

Hot Apps

Hi there and I hope you are all well and rested after the half term break last week. My wife and I went to stay at The Lifeboat Inn in Thornham, Norfolk last week. Despite the weather we had a great time and the break was just what we both needed.

Today I will introduce you to five apps that I think you will like. With so many to choose from, over 250,000 on the Apple App store, it can be difficult to find the good ones and I often read reviews like this before making the choices myself.
Included in the description is the size of the app so you are aware of how much disk space theses apps will use.
All the apps I review on this site I use personally and whilst I will generally introduce the good ones I will, from time to time, warn you against apps I think are a waste of money.
Anyway back on topic and to let you know that all the following are available from the Apple App store. The first app I will start with is,

The FreeAppADay.com (5.3mb) free download


FAAD icon

FAAD is an app that looks for free apps on the Apple App store. It is updated daily and in general it offers 5 or 6 apps at a time. It also looks for apps that are available at a reduced price but I tend to wait until they are free!
A majority of the apps are available from both the US and UK app stores and are only available for 24 hours a time.
I check with FAAD daily and have come across some real bargains since I have been using it.

today's free apps

FAAD is simple to use and once on the selection screen you side scroll through the daily choices. There is a preview screen which gives a more detailed description and it links directly to the official Apple App store for downloading.
Don't expect to find apps you want on a daily basis but you can usually find a few during the week that are worth looking at.

The next app on my list is called,

TechUpdate (3.9mb) 59p


TechUpdate icon
TechUpdate gives you access to over 27 tech based blog sites from one app. Before I used this app I had at least 6 separate apps on my device but since using this they have all been deleted.
TechUpdate gives you access to all the popular sites such as Engadget, MacRumours, Mashable and Apple Insider etc and all are updated regularly so the news is literally "hot off the press"!

default main screen


more choices

There is an added bonus with this app in so much that, even when it is closed, it will update in the background and the content is viewable without access to the Internet.
The main screen is fully editable so you can easily set it up with your favourite blog sites on one page.

configuration page

This is an app I consider to be essential if you like to stay abreast of what is new. I like the layout and the ease of use, even an old git like me can use it! Well worth the 59p and a has a permanent place on my device.

The next app is called,

System Manager (2.9mb) free

System Manager icon

System Manager is an app that allows you to manage all the active processes on your iPhone.
It is beautifully laid out with visual references for items such as disk space, battery condition, active processes etc.
I use this a lot and have found it to be invaluable when I want to monitor how much free disc space I have left. It also gives you full information about the device such as its ID and network connections etc.

disc space page
This also has a little gem that really does improve your devices performance.
There will be many times when you find that your iPhone feels laggy in performance, even when you have closed down all inactive apps. Well with System Manager you can go one stage further by manually refreshing the amount of free RAM that is available.
If you refresh prior to playing games or using one of the more memory intensive apps you will find that your iPhone runs a lot smoother.


RAM page
There is a host of useful and interesting information stored on this app as well as tips on improving battery life and performance.
This is another app I use daily and whilst some may be scared off by its apparent "geekiness", let me say that by just using the RAM refresh your iPhone experience will be vastly improved.

We are now down to the final two apps for today. I intend to do a full review of both of these in the next few days because they are, in my opinion, two of the most essential apps currently available.
The first of these is,

WhatsApp Messenger (6.1mb) 59p


WhatsApp Messenger icon

This is a cross platform, smartphone messenger. By using this brilliant app you can text anyone who has a smart phone whether its an iPhone, Android, Nokia or Blackberry and this is done without having to have to log in or have an easily forgotten user name and password.

chat screen
WhatsApp Messenger has a multitude of uses. You can group chat, send audio messages and send video or picture images for free. In other words wave goodbye to paying for SMS messages when you use this app! 

choices, choices!
This app is a pleasure to use. It is nicely laid out and easily configurable to your choice. I use it daily and can even chat with my friends who were stupid enough not to buy the iPhone!
The final bonus to this app is that you will incur no charges even if you are using it with someone who is abroad!

OK we are down to the final app in this article.
There are so many photo editing apps available that I found it very difficult to settle on one alone. I have tried them all, literally and have come to the conclusion that the following is the best. The app in question is,

Photogene (4.1mb) £1.19


Photogene icon
If you enjoy taking photos and tinkering about with the images on your iPhone then Photogene is the app for you.
Unlike many of the leading competitors, this app is intuitively laid out, easy to pick up and learn and the end results are excellent.
Photogene allows you to perform all the necessary changes to images such as crop, rotate, straighten, sharpen etc. You can post your finished picture on Facebook and Twitter amongst just some of the choices.
The interface is clean and very user friendly with a little practise you will make improvements to your pictures you thought were not possible.
Below are images of just some of the various settings available to the user.


As I have already mentioned, I will be doing a more in depth review of this app later this week but suffice to say that if you purchase Photogene you will not be disappointed.

I hope this post has given you some good ideas of just some of the excellent apps available. I have collected hundreds so if you have a question about an app not covered in this post, feel free to leave your question in the comments box.

Andy